Table of Contents
Why We Do Beach Assessments for Kitesurfing?
Beach assessments are one of the most important things to learn during your kitesurfing tuition, which is why we teach it both at the beginning of Session 1, and refresh it at the start of any lessons we teach after that. Performing beach assessments for kitesurfing at the beginning of a session and re-assessing throughout is the first step to being a safe kitesurfer. Recognising hazards allows you to make decisions that maintain the safety of you and others around you.
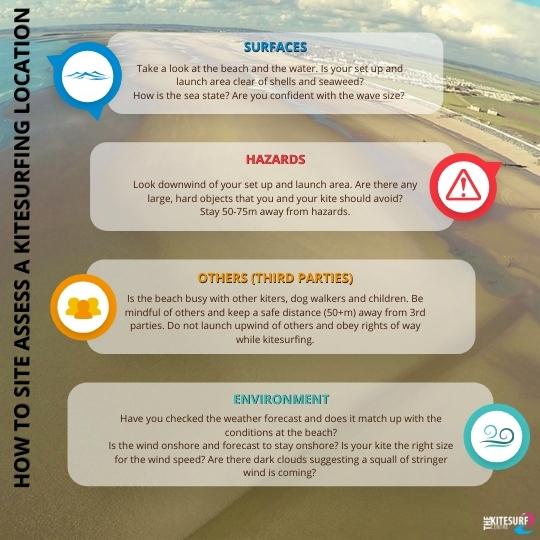
We use the mnemonic ‘SHOE’ when performing a beach assessment, to help us remember each step:
S – Surface
H – Hazards
O – Others
E – Environment

S is for ‘Surface’
Before setting up, you should already be doing beach assessments for kitesurfing and this will start with the surface upon which you are setting up your kite and the area on which you intend to launch your kite. While we’re focussing on the letter “S for Surface”, let’s also remember Sharp and Slippy as the two land surfaces that you’ll want to avoid. Aim to find a good open sandy area that is free of seaweed and shells.
Next, take a look at the water for movement and variation. When doing beach assessments for kitesurfing, you can use these to judge things like wind speed and water depth, which will help you decide both where to kite and what equipment to use.
The surface of the water can also give us clues about where to kitesurf and what equipment to use. Shallow water is created by sandbanks, so the waves will be higher in shallow water than they are in the surrounding area. Very shallow water can be spotted easily by either seeing through to the ocean floor or by very small ripples. On a flat or very slightly sloping beach, the very edge of the shoreline and for a few metres, the water is only a couple of inches deep and is normally flat. Whilst there is a temptation to try and kite on shallow, flat water, avoid it. The risk of crash injury is much greater.
H is for ‘Hazards’
It’s always important to check for hazards around you, both during the beach assessment before your session and throughout the session itself. The usual rule when setting up your kite is to make sure you are at least two line lengths (approximately 50 metres) away from any hazards. This way, if there is a problem during launch you have more time to correct it, and or release your kite, before coming too close to a hazard.
Different hazards can appear at different tide states, so it is important to know at which times you cannot kite safely at a beach due to these hazards. For example, at high tide there may not be enough beach space for you to launch keeping at least two line lengths away from hazards such as sea walls and buildings. At low tide, hazards on the sea floor such as shipwrecks and trash may appear.
O is for ‘Others’
When you’re kiting, it’s highly unlikely that there will be no one else around. In fact, if there is no one around then it is important to check why – are the conditions not suitable for kitesurfing? Is there a hazard (that perhaps you are unable to see) at the beach, which makes it too dangerous to kite there? Be especially thorough with your beach assessments for kitesurfing. As kitesurfing becomes more and more popular it is likely that if there is no one else kitesurfing there is a very good reason that you shouldn’t either. The safest way to launch is also to have someone with you to assist you, and self-launching is only recommended for advanced level kiters.
Keep in mind that other people at the beach may not be kitesurfers, so they may not know that it is unsafe to walk underneath your lines or to swim out in an area where people are kitesurfing. If someone gets too close or is putting themselves in a position of danger politely ask them to move, explaining why. At some beaches there are designated kiting zones, so ensure you keep to them.
E is for ‘Environment’
As with hazards, it is important to check the environment in your beach assessment for kitesurfing. When planning to go kitesurfing at a particular beach, you should always check the weather forecast before leaving to avoid driving for hours to find a completely windless beach! However, it is important to remember that it is only a forecast, and you should base your kite size decisions on what is actually happening at the beach, not just the forecast.
In order to roughly determine the wind speed, you can look for certain things:
- White caps start to form at around 8 – 10 knots, and become more frequent and prominent as the wind increases (take care to remember that things like land masses or harbours may mean that the water remains flat despite there being strong wind)
- Seagulls are able to hover at around 20 knots
- Sand starts to blow across the beach at approximately 25 knots
Windsocks allow you to gauge the wind more precisely. Each stripe on the windsock, starting from the one closest to the flagpole, indicates a speed of 3 knots. You can count how many stripes are flying horizontally (rather than appearing to hang down) and calculate the speed, up to 15 knots (the entire sock flying horizontally). If you’re looking to practise light wind flying, this is perfect!
You can use clues like this to determine which kite size to use, whether or not to take a larger or smaller board, and if you will adjust your line length.
Beaches like Camber Sands experience thermal winds which can add an extra 30% onto the forecast, so a 25mph forecast could mean a 33mph wind. This is one reason why we advise kitersurfers to bring all of their kites in the car with them, as it can be the case that the one kite you leave at home is the one you end up needing! If you are stuck in this position, you should never go out on the wrong sized kite as it can be very dangerous. Either rent a kite or do not go out.
