How do Kitesurf Kites Fly ? A simple 4 piece puzzle

Learning how a kitesurf kite works can improve your kiting abilities. Understand how your kitesurf kite works and what it needs and you could find yourself reading the environment around you, making for the best sessions of your life. Often a good kiter is a knowledgable kiter!
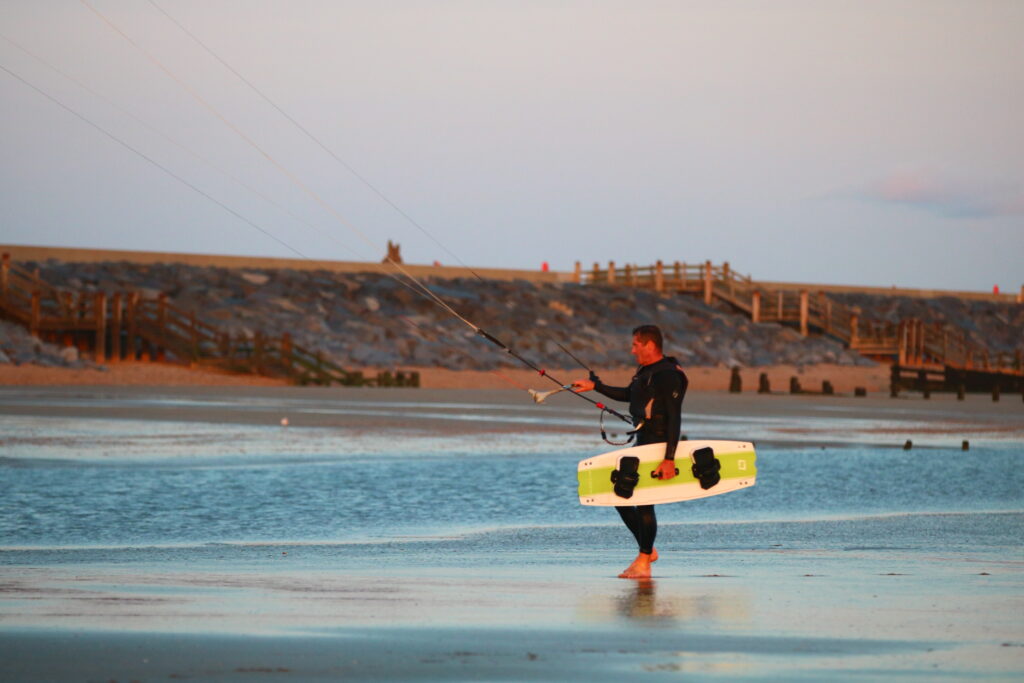
tony-flying-his-kitesurf-kite

How your bar controls your kitesurf kite.

Most modern Leading Edge Inflatable (LEI) kitesurf kites use a four-line bar with two front lines and two steering lines which connect to your kite’s bridles.

The two front lines of your bar connect to the leading edge attachment points and support the force of the kite, but do not control direction. The steering lines connect to the steering bridle attachment points and affect both direction of the kite and the kite’s angle of attack to the wind.

Your kite may have multiple connection options to adjust it’s performance. Take a look at this guide to tuning your LEI kite (link) to understand how you can use these settings.

As you connect your bars chicken loop to your harness, the force of the kite is not felt in your arms but in your core. You are able to control the angle of the kite to the wind by sheeting the bar in or out along the depower throw.

Forces acting on the kite

forces-acting-on-a-kitesurf-kite

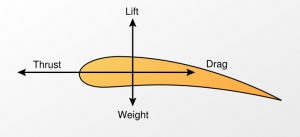
The forces occurring as air passes over and under the kite effect how it flies. Like the wing of an aeroplane, our kite also deals with lift, drag, thrust, and gravity – it also has line tension as an additional force. We’ll quickly introduce these terms before explaining what the effects they have. To keep a kite flying steady the four forces must be in balance.

Lift is the upward force that pushes a kite into the air. Lift is generated by differences in air pressure, which is created by airflow passing above and below the body of the kite. Kites are designed so that air particles moving over the top of the wing, flow faster than the air moving over the bottom. Gravity acts as a downward force on the kite, relative to the weight of the kite. The force of the weight pulls the kite toward the ground.

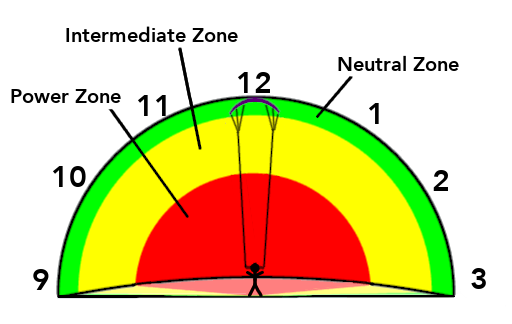
Thrust is the forward force that propels a kite in the direction of motion. A kite relies on the tension from the lines and moving air created by the wind to generate thrust. Thrust is the reason why the kite will always fly towards the edge of the wind window and won’t stay in the power zone; the kite must fly towards the most upwind point of the wind window.

Drag is the backward force that acts opposite to the direction of motion. Drag is caused by the difference in air pressure between the front and back of the kite and the friction of the air moving over the surface of the kite.

Changing the angle of attack with the bar?

Angle of attack

As the wind reaches the kite, airflow splits at the leading edge of the kite passing over and under it’s surfaces, moving towards the trailing edge, and continuing downwind.

The flow of air going over and beneath the kite reach the trailing edge at the same time. Due to the angle of the kite, the airflow going over the top of the kite must accelerate to reach the trailing edge at the same moment as the airflow passing beneath.

It is this acceleration of airflow over the top of the kite that forms low pressure above the kite and creates lift. The more lift generated, the more it pulls you.

If flying a fixed bridle trainer kite, like the one you use in session one, it’s angle to the wind can only be changed by steering the kite into each zone in the wind window (link). As the kite is flown into the power zone, and the angle of attack is increased, you get the most pull (lift). This is because air is accelerating faster here to reach the trailing edge at the same time as the airflow passing the underside of the kite. You’ll also notice that the kite flies faster through the power zone due to increased thrust.

Sheeting in and sheeting out

If we are flying a depowerable kite, such as the Leading Edge Inflatable (LEI) kite used on the water part of your lessons, the bar can be “sheeted in” and “sheeted out”, pulling the bar closer to us or pushing further away from us along the depower throw. This movement of sheeting on the bar changes the kites angle of attack, giving you additional control over how much lift the kite generates.

Pushing the bar out: (Sheeting out) reduces rear line tension and reduces the kite’s angle of attack so the kite generates less lift. Which in turn pulls the wing tips and the trailing edge of the kite closer to the wind. The result is a tighter turn radius when steering and normally more power, though it is possible to negatively affect the kite by pulling in the bar too much.

Pulling the bar in: (Sheeting in) increases rear line tension and the angle of attack which generates more lift as airflow accelerates over the top of the kite. In this position, the kite generates less power but also has less line tension for controlling direction while steering. With the bar out, the turn radius of the kite will be large and the kite slower to respond to counter steering.

It’s important to remember that this is an additional factor to the amount of lift created by the position of the kite in the wind window. If you steer the kite through the power zone, the kite will still pull you hard, even with the bar sheeted out.

It is possible to “over-sheet” and pull the bar in too far, increasing the angle of attack beyond the kites stable flying range causing unbalanced forces on the kite. When we pull the bar in too far, the airflow over the top of the kite becomes turbulent and can no longer accelerate to the trailing edge to create lift and thrust. This results in an imbalance of pressure above the kite and increased drag. The kite will then “backstall” and fall backwards, instead of flying forwards.

You will be able to recognise when your kite is backstalling as it will feel sluggish, lose power and then fall backwards through its trailing edge. Pushing the bar out will correct this by reducing drag and allowing the kite to fly forwards again.

Our ability to recognise signs of backstalling will enable us to correct our input at the bar and put the kite into a more efficient flying position quickly. A great way to learn this skill is to practice light wind kite flying (link) as you will learn to be more aware of bar position while flying the kite.

Want to know more about the histroy of kitesurf kites? Have a look at this short film about the history of kitesurfing here

NEXT UP: How to launch and land a kitesurf kite

The 4 Essential Beach Assessments for Kitesurfing that Could Save Your Life

Beach-Assessments-for-Kitesurfing
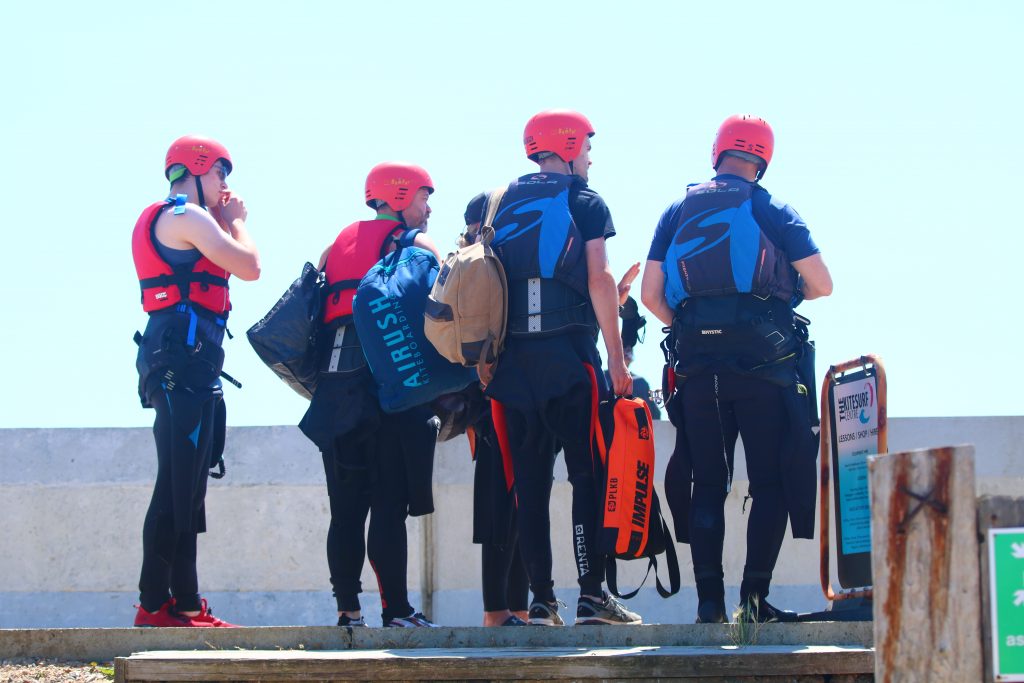
Be thorough when performing beach assessments for kitesurfing, especially for the first time at a new spot.

Why We Do Beach Assessments for Kitesurfing?

Beach assessments are one of the most important things to learn during your kitesurfing tuition, which is why we teach it both at the beginning of Session 1, and refresh it at the start of any lessons we teach after that. Performing beach assessments for kitesurfing at the beginning of a session and re-assessing throughout is the first step to being a safe kitesurfer. Recognising hazards allows you to make decisions that maintain the safety of you and others around you.

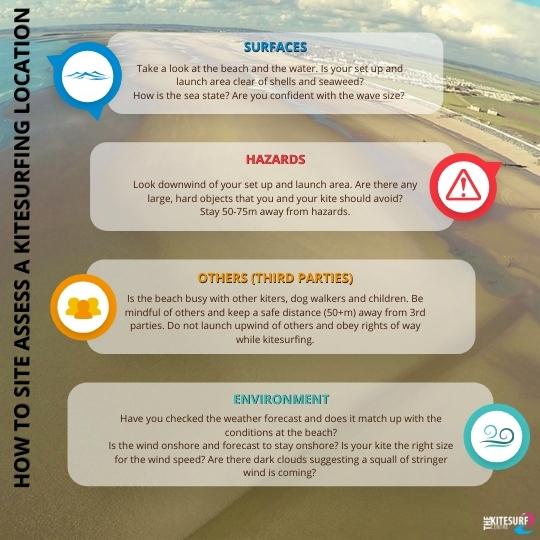
We use the mnemonic ‘SHOE’ when performing a beach assessment, to help us remember each step:

S – Surface

H – Hazards

O – Others

E – Environment

beach-assessments-for-kitesurfing

S is for ‘Surface’

Before setting up, you should already be doing beach assessments for kitesurfing and this will start with the surface upon which you are setting up your kite and the area on which you intend to launch your kite. While we’re focussing on the letter “S for Surface”, let’s also remember Sharp and Slippy as the two land surfaces that you’ll want to avoid. Aim to find a good open sandy area that is free of seaweed and shells.

Next, take a look at the water for movement and variation. When doing beach assessments for kitesurfing, you can use these to judge things like wind speed and water depth, which will help you decide both where to kite and what equipment to use.

The surface of the water can also give us clues about where to kitesurf and what equipment to use. Shallow water is created by sandbanks, so the waves will be higher in shallow water than they are in the surrounding area. Very shallow water can be spotted easily by either seeing through to the ocean floor or by very small ripples. On a flat or very slightly sloping beach, the very edge of the shoreline and for a few metres, the water is only a couple of inches deep and is normally flat. Whilst there is a temptation to try and kite on shallow, flat water, avoid it. The risk of crash injury is much greater.

H is for ‘Hazards’

It’s always important to check for hazards around you, both during the beach assessment before your session and throughout the session itself. The usual rule when setting up your kite is to make sure you are at least two line lengths (approximately 50 metres) away from any hazards. This way, if there is a problem during launch you have more time to correct it, and or release your kite, before coming too close to a hazard.

Different hazards can appear at different tide states, so it is important to know at which times you cannot kite safely at a beach due to these hazards. For example, at high tide there may not be enough beach space for you to launch keeping at least two line lengths away from hazards such as sea walls and buildings. At low tide, hazards on the sea floor such as shipwrecks and trash may appear.

O is for ‘Others’

When you’re kiting, it’s highly unlikely that there will be no one else around. In fact, if there is no one around then it is important to check why – are the conditions not suitable for kitesurfing? Is there a hazard (that perhaps you are unable to see) at the beach, which makes it too dangerous to kite there? Be especially thorough with your beach assessments for kitesurfing. As kitesurfing becomes more and more popular it is likely that if there is no one else kitesurfing there is a very good reason that you shouldn’t either. The safest way to launch is also to have someone with you to assist you, and self-launching is only recommended for advanced level kiters.

Keep in mind that other people at the beach may not be kitesurfers, so they may not know that it is unsafe to walk underneath your lines or to swim out in an area where people are kitesurfing. If someone gets too close or is putting themselves in a position of danger politely ask them to move, explaining why. At some beaches there are designated kiting zones, so ensure you keep to them.

E is for ‘Environment’

As with hazards, it is important to check the environment in your beach assessment for kitesurfing. When planning to go kitesurfing at a particular beach, you should always check the weather forecast before leaving to avoid driving for hours to find a completely windless beach! However, it is important to remember that it is only a forecast, and you should base your kite size decisions on what is actually happening at the beach, not just the forecast.

In order to roughly determine the wind speed, you can look for certain things:

  • White caps start to form at around 8 – 10 knots, and become more frequent and prominent as the wind increases (take care to remember that things like land masses or harbours may mean that the water remains flat despite there being strong wind)
  • Seagulls are able to hover at around 20 knots
  • Sand starts to blow across the beach at approximately 25 knots

Windsocks allow you to gauge the wind more precisely. Each stripe on the windsock, starting from the one closest to the flagpole, indicates a speed of 3 knots. You can count how many stripes are flying horizontally (rather than appearing to hang down) and calculate the speed, up to 15 knots (the entire sock flying horizontally). If you’re looking to practise light wind flying, this is perfect!

You can use clues like this to determine which kite size to use, whether or not to take a larger or smaller board, and if you will adjust your line length.

Beaches like Camber Sands experience thermal winds which can add an extra 30% onto the forecast, so a 25mph forecast could mean a 33mph wind. This is one reason why we advise kitersurfers to bring all of their kites in the car with them, as it can be the case that the one kite you leave at home is the one you end up needing! If you are stuck in this position, you should never go out on the wrong sized kite as it can be very dangerous. Either rent a kite or do not go out.

4 Steps to Powerkite better than ever

Learning to fly a powerkite is the first step to learning to kitesurf and is something you can continue to do to further improve your kite flying skills. Since 80% of kitesurfing is kite control, it is the best way to speed up the learning process. Powerkite flying is also useful for students who want to learn either kite buggying or kite landboarding, rather than heading into the water. Powerkite flying is taught on Day 1 of all of our group kitesurfing courses, at the beginning of the kite buggying and kite landboarding courses, and we also teach a standalone powerkite flying lesson.

Site Assessment

As with any kiting, the first stage of setting up and flying your powerkite is to perform a full site assessment of the location you have chosen. The site assessment is important to ensure the safety of you and others around you, as well as reducing the risk of damaging your kite.

Once you have performed a site assessment and decided it is safe to fly where you are, it is time to set up the kite. The instructions below are for a Peter Lynn Impulse Trainer, which we use in our school, but they will work for other 3 line trainer kites. We use the Impulse Trainer because it is incredibly easy to use, super fun to fly and pretty indestructible – you’re bound to crash the kite a few times as you learn so this is important! The Peter Lynn Impulse Trainer comes with pre-attached flying lines, making it very easy to set up.

Setting Up

During the site assessment you will have determined which way the wind is blowing, so you know which direction downwind is. You will also have noted how strong the wind is, which will affect your choice in kite size. The Impulse Trainer comes in 3 sizes; 1.5m, 2m and 3m. At The Kitesurf Centre use these on the majority of our lessons, though if the wind is particularly strong we may also use a Flexifoil Buzz 0.6m.

powerkite-wind-window-theory

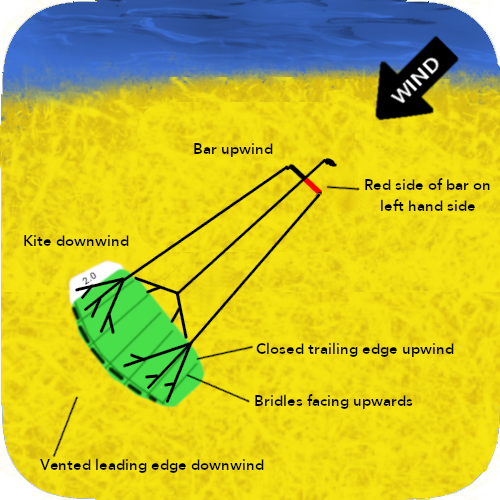
First, take the kite out of the bag and roll it out gently on the floor downwind of where you will be standing to fly it, with the lines on top of the kite and the open, vented edge (known as the Leading Edge) furthest away from you. Check the bridles are not tangled – if you have packed the kite away neatly (which you’ll learn later in this tutorial), this should not be a problem. However, it is always important to check.

Next, weigh down the trailing edge of the kite. If you are flying on the beach you can use sand (taking care to avoid stones and shells), if you are flying inland you can use small weighted bags.

Walking backwards upwind, unwrap your lines, checking for any damage as you go. Once you get to the end of the lines, lay the bar on the ground with the red side of the bar on the left, and the safety line running cleanly through the bar. Check the bar and safety line for any damage whilst you do this.

Walk back up the lines towards your kite, separating them as you go by running them between your index and middle fingers. The red (left) steering line will go the left bridle, and the right (black, green or blue) line goes to the right bridle. If your kite has 3 lines, as the Impulse Trainer does, the safety line attaches to a bridle along the trailing edge. On 2 line kites, the safety line is one of the steering lines, so the kite will flag out along this, with your wrist safety leash attaching to the right side of the bar.

If your lines do not come pre-attached, use a larks head knot to connect each line to its corresponding bridle. You can make a larks head knot by passing the loop at the end of the line over the line and pulling the line through to create a new loop, then running the knot at the end of the line you are attaching through this loop and pulling the loop close next to the knot. Check each knot is secure before flying the kite.

Double check that everything is set up properly, that each connection is secure, the bar is the right way, and that there is no damage to the kite, bar or lines.

Launching the Powerkite

The safest way to learn to fly a trainer or powerkite is to take a lesson with a fully qualified instructor. This will ensure you learn the correct techniques and safety procedures. However, there are some basic kite flying techniques you can go through on your own (and even repeat after a lesson) to improve your skills. You can fly the kite on your own or with a friend – it’s good for safety to have someone to help you with setting up and launching / re-launching the kite, but it’s also just great fun to have a friend to fly with!

Before launching, it is important to become familiar with how the kite is controlled; how it steers; how you can reduce the power. You can control the kite in a similar way to a bicycle, if you pull your right arm towards you and extend your left arm away from you, the kite will steer right. Likewise, if you pull your left arm towards you and extend your right arm away from you, the kite will steer left. The wrist leash allows you to remove all of the power in the kite instantly by letting go of the bar. The kite will fall to the ground without any pull.

Once you are familiar with the controls for the kite and are ready to fly it, attach your wrist leash and pick up the control bar. Check the surrounding area again for any hazards – trees, people, rocks etc. Ensure your back is still to the wind, as the direction may have changed slightly whilst you were setting up the kite.

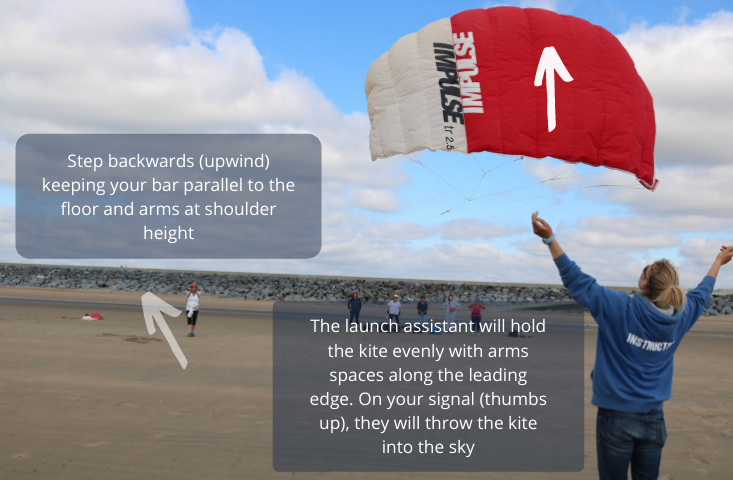
All checked? – you’re ready to fly! Holding the bar in your hands, step backwards away from the kite. This should cause the kite to pick up the wind enough that the sand you have used to weigh down the trailing edge falls off. If it is not enough, try taking another small step backwards and gently pulling the bar towards you. Keep your bar straight so that the kite launches and flies straight overhead, coming to rest at 12 o’clock in the wind window.

powerkite-launching

Flying the Powerkite

When you are ready, gently steer left and right with small movements of the bar, remembering to keep your back to the wind and steering the bar like a bicycle, rather than like a car steering wheel. Keeping the kite high produces less power, steering the kite lower increases the power. As you become more confident, you can begin to use larger movements and steer the kite through the power zone to generate more power.

Always aim for symmetry in the movement of your kite – using smooth and controlled motions. Imagine the upper half of a clock face in front of you and fly the kite in a figure of 8 motion, first between 12 o’clock and 2 o’clock, and then between 12 o’clock and 10 o’clock.

You can also practise keeping the kite still at each position on the clock; 10 o’clock, 11 o’clock, 12 o’clock, 1 o’clock and 2 o’clock. This will take time, but the more you practise the more natural steering and keeping the kite still will become, and these control skills are directly transferable to flying LEI kites which you use in kitesurfing.

Once you have mastered the basic control of the kite, you can try to control the kite with one hand. This is a skill you will use a lot when kitesurfing, so it’s great to cover it early. You can also practise flying the kite without looking at it, trying to feel where the kite is in the air from the sensations coming through the bar.

Remember, if at any point you feel you are not in control of the kite, simply let go of the bar and all of the power in the kite will dissipate instantly. You can then begin the launch process again, making sure to check for any damage again before you relaunch.

Still not sure? Have a look at this video for some more visual aids